How To: Install MS-DOS on a Modern Computer
For those needing to replace old controller hardware on cutting mills, those into native retro gaming, or for those who want to see what all the fuss was about in the 1980's, or for those who just want a play with old but great technology, this tutorial shows you step-by-step processing getting the breakthrough desktop operating system running on the latest greatest hardware.
Step 1: PreparationFor this project, you will need the following:1 copy of MS-DOS 6.22 floppy diskette images1 computer1 install of Oracle VirtualBox (it's multiplatform, so chances are you can obtain this). This is a free virtualisation application.some free hard drive space.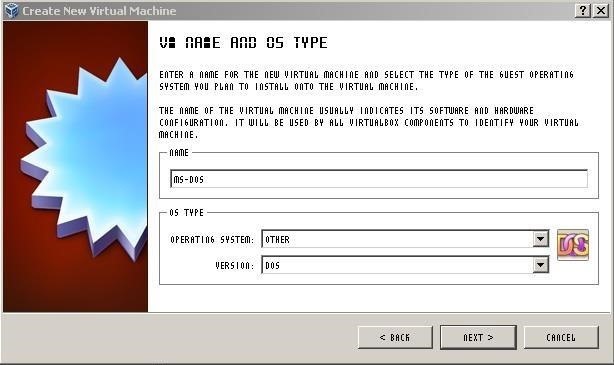
Step 2: Set Up the EnvironmentCreate a new VM called DOS. Use the Wizard in VirtualBox, that's what it's there for.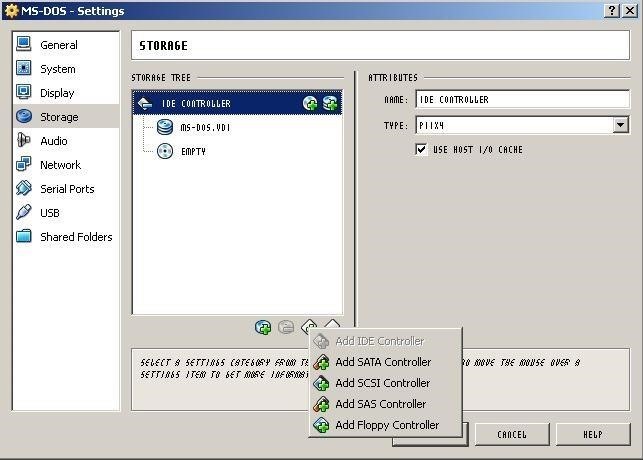
Step 3: Set Up the Environment (Continued)Leave the Base Memory set at 32MB. It's enough for most things DOS, any higher and you will start to see weird errors.Set up a NEW HARD DISK with dynamically allocated size NOT MORE than 2.00GB. FAT (the filesystem which MS-DOS 6.22 uses) CANNOT handle volumes larger than this!Once this is all set up and the Wizard finished, you should have a nice pristine DOS VM ready to be populated.Locate your floppy disk images. You won't be needing them just yet, there's one more thing you need to do. Right click on your new VM and select "Settings". Go to Storage and add a floppy controller.
Step 4: Building the Appliance 1. Initial EnvironmentNext add a Floppy Device (click the disk next to the new controller that just popped up) and choose the first disk in the installation images when asked. Click OK and start the VM.As it's a DOS VM it will first look for a floppy controller from which to boot. It'll go through the motions to install and eventually will ask for Disk 2.Don't panic, here's what you do: go to Devices->Floppy Devices->Choose A Virtual Floppy Disk File and select Disk 2. Same procedure for Disk 3. When the VM asks you to restart, remember to remove the disk image from the virtual drive or it'll throw a non system disk error!By the end of it you'll have a very basic DOS environment, ready to go. If the restart causes the system messages to appear on one line at the top of the screen, simply reset the VM.The next thing to do, before you do ANYTHING ELSE, is to clone the VM as it sits, use the clone for testing software before you commit the installation process to the original VM (potentially BREAKING STUFF if it goes wrong!), this way if you break a fully populated VM instead of having to rebuild and remember how you did it, you can just simply clone a spare.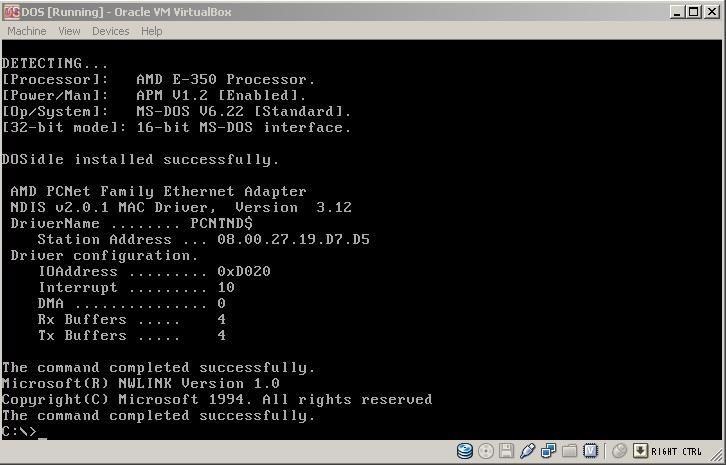
Step 5: Building the Appliance 2. Adding a CDROM DriverNext up, it's adding the CDROM driver. Simplest way (the only way at this point!) is to download a CDROM driver floppy image. Do a search for an OakCDROM floppy image, and load it like you did the DOS install images, then in your VM go to drive A: and xcopy all the files to your /DOS folder.Next step is to add this line to your CONFIG.SYS:DEVICEHIGH=C:\DOS\OAKCDROM.SYS /D:MSCD001Then add this to AUTOEXEC.BAT:LH C:\DOS\MSCDEX.EXE /:MSCD001Reset the VM. You should see a new drive (drive D:) pop up. You are now ready to install applications using CDROM images instead of swapping out floppy images!
Step 6: Adding StorageIMPORTANT caveat: Dblspace/Drvspace compression WILL NOT WORK on these appliance volumes, in fact attempting to deploy DxxSpace on a VirtualBox DOS appliance will BREAK IT. So please, don't ask me how to rescue a DxxSpace-broken appliance, because it cannot be done. This is why we have clones. Recovery is as simple as deleting the old broken clone and copying from the known-good spare (which I know you have!).This procedure is a lot simpler than adding a new hard drive. In fact, you don't even have to pop the cover on your computer!With the VM shut off, go into Settings->Storage and add another virtual hard disk (as shown). Click on "Create New Disk" and advance two screens. This is where you get to size it. Select Dynamically Allocated, and in the next screen adjust to 2.00GB or less (a reminder: DOS CANNOT handle a partition larger than 2.00GB). It might be an idea to give the new disk an identifiable label as well, like "DriveD". Hit Next then Create.Caveat: since this is a virtual appliance, you might be forgiven for thinking that you can just pile drive upon drive, but you need to remember that you're emulating an old APM system. The rules apply now as they did then: you cannot add more than four devices per IDE controller, and DOS does not support SATA in native mode (SATA in IDE mode works; VirtualBox seems to apply this mode automatically, so you can add more drives to a single SATA controller if you need to). So if you're trying to add more than four devices to the IDE controller, you're SOL; you'll have to add a SATA controller.My rule of thumb in this regard is: use a maximum of TWO IDE devices for virtual hard disks, add more via the SATA controller. Reserve the other two IDE device ports for the CDROM and things like Zip/Jaz drives, tape streamers, etc., that connect to the Host via the IDE interface or that you want DOS to access via the IDE interface. You now have a new drive in your VM, which you can access by starting the VM and running FDISK. Select Option 5 (change current fixed disk) and select disk 2. This will take you back to the main menu, where you can create a new partition and use the maximum available space on the volume to create a primary partition (this is the same as dedicating a standalone hard drive 2GB in size for storage on a single partition). To confirm this check the Partition Information and you should see something very close to what you see in the image. Exit FDisk, reset the VM then use the "Format d:" command to prepare the drive for use. As your storage needs increase, you can add up to 24 hard disk partitions total (including C:) before you run out of letters (after all, who really needs more than 48GB of space??), less if you have a CDROM driver installed.
Step 7: FootnotesSince MS-DOS is based on old APM BIOS technology, it's not 100% compatible with newer gear which these days uses EFI rather than Flash BIOS (ACPI). In essence, this causes the appliance to hog CPU resources since MS-DOS has zero concept of scheduling. The way around this is to install a program that resides in memory inside the appliance to throttle the CPU to the appliance. This also helps prevent crashes which can bring down the main system. Also, there are issues surrounding applications and games that use EMS; this can be gotten around by running them in an appliance running Microsoft Windows 95 OEM SR2 or 98/98SE.
[question] how do I remove a tweak if cydia crashes when I try to click remove Question (self.jailbreak) submitted 3 years ago by idonthaveanametoday iPhone 6 Plus, iOS 8.4 I've tried this in safemode and I'm not near a wifi network.
How to Delete Cydia and Electra Jailbreak on iOS 11 - 11.4.1
Automatically download TV Shows using RSS! How to Automatically download your favourite TV shows when they air using ShowRSS.Info and Utorrent. How to access all the latest TV and Movies for Free
Best way to watch Live TV on Kodi for free using addons and
How To: 3 Ways to Get More Out of Your OnePlus One's Camera News: After Leaks, OnePlus Puts It All Out There with OnePlus 5 Photo How To: 5 Tips for Recording Better Videos with the OnePlus Camera App News: The OnePlus 6T — a Few Additions and 1 Major Subtraction
The Best Way to Record Calls on Your OnePlus 3 or 3T
News: The Latest Razer Phone 2 Leaks Suggest Project Linda Might Actually Happen News: Razer's New Gaming Phone Leaked in Promo Video Ahead of Announcement Razer Phone vs. Galaxy Note 8: Comparing the Android Phones with the Best Specs
Linda Stone - May I Have Your Attention Please? - InterNoobs
Siri isn't the brightest bulb in the box and she often misunderstands unusual words and names. Fortunately, you can teach her how to speak properly by adding phonetic pronunciations to your contacts.
4 ways to make Siri smarter on your iPhone - CNET
This tutorial shows you first how to take apart your iPhone 4 (you'll need a set of specialized tools, like a very small screwdriver and a pair of tweezers). Then, after you've taken it apart, you're also shown how to put it back together. Make sure you don't lose any screws
iPhone Repair - Official Apple Support
News: Use Android's Airdrop-Like Nearby Service to Share Things More Easily How To: Customize Skip Length in Your iPhone's Podcasts App How To: Raw Cyrus from Spill.com How To: Make and distribute a successful podcast
Is There Software Similar to Wifikill, That Kills Nearby
Homemade Night Vision - How to Make Night Vision Goggles
WiFi Prank: Use the iOS Exploit to Keep iPhone Users Off the Internet How To: Everything You Need to Know About Apple's New iOS 7.1 Beta 5 for iPad, iPhone, & iPod Touch How To: Get iOS 5 for Your Apple iPad, iPhone or iPod Touch
How to Keep Comcast from Using Your Router as a Wi-Fi Hotspot
⇓ Mirror 1 Link ⇓ or ⇓ Mirror 2 Link ⇓ - Download Links for HACK FACEBOOK ACCOUNTS : FACEBOOK FREEZER Open and install following the instructions provided inside installer. Enjoy and save the page for updates or ChangeLogs.
HACK FACEBOOK ACCOUNTS : FACEBOOK FREEZER Download Working
The stock weather widget preloaded on your Samsung Galaxy S4 is really great, but there's one thing that's missing—options. The weather widget shows just the right amount of information at a glance, and it's not too shabby looking either, but for us softModders, it'd be really nice to have more options.
How to Make the Stock Weather Widget Transparent on Galaxy S4
Computers The fastest way to close all running programs in Windows. With just a handful of keystrokes you can shut down all active apps on your system via Task Manager's Programs tab. Plus: power
How to clear notifications in Notification Center on iPhone and iPad; How to access Lock screen notifications on your iPhone and iPad. The Lock screen is the screen you see when you first wake up your iPhone, whether it's by pressing the Sleep/Wake button or by lifting your iPhone to wake it up. It's also where your notifications pop up.
Use notifications on your iPhone, iPad, and iPod touch


0 comments:
Post a Comment