How To: The Free Way to Save iPhone Voicemails on Your Mac
Voicemails are like chores for me. I have to listen to them, but never really feel like doing it. When I finally do, most of them get deleted right away, but every so often they'll be one I save and listen to over and over again, whether it's a cute birthday wish from grandma or a hilarious joke from my friend.When you come across a voicemail that you want to keep forever, transferring it over to your computer makes total sense, but it's not a simple task to do if you have an iPhone. While there are apps like iExplorer and PhoneView, they cost too much to use just for a voicemail here and there.Instead of handing down any cash, I'm going to show you how to extract all of the voicemails on your iPhone to your computer and convert them into shareable files, all thanks to a few Terminal commands.Don't worry, the process might sound tedious, but it's straightforward and simple enough to understand as long as you follow the steps below.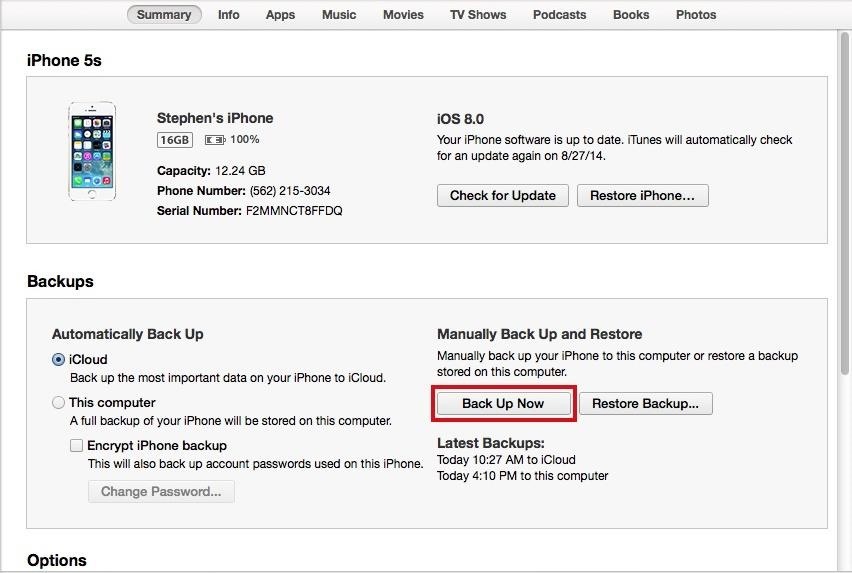
Step 1: Back Up Your iPhoneIf you want the voicemails from the iPhone you're currently using, you'll need to backup your device through iTunes—not via iCloud. Do so by connecting your iPhone to your computer, opening iTunes, and clicking on Back Up Now from your iPhone's Summary page. If you want to pull voicemails from an older backup, skip directly to Step 2.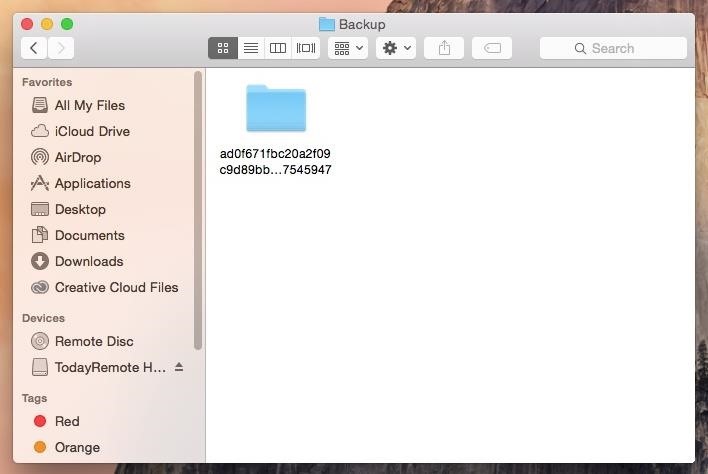
Step 2: Find the Backup FolderAfter the backup is complete, you'll need to find the folder where the iPhone backup is stored.Open Finder. Press and hold down the Option key. Click Go in the menu bar. Select Library. Go to Application Support -> MobileSync -> Backup. All of your iTunes backups will be in the Backup folder. Show all of your items in List View so that you can see the date for each backup. That way you'll find your most recent backup or older ones that you want to pull voicemails from.
Step 3: Copy & Rename the Backup Folder, Create iOSVoicemails FolderSince you don't want to mess up your backup (for future purposes), we're going to make a copy of the folder and paste it onto your desktop. Simply right-click on the backup folder and select Copy "Backup Folder Name". Now right-click on an empty space on your desktop and select Paste Item. Since these backups are pretty large, it might take a few seconds for the folder to copy over to your desktop.Rename the folder to something easier than those mess of letters and numbers by right-clicking on the folder, selecting Get Info and entering a name into the Name & Extension: box. Let's use iOSBackup as the name, to make things simple.Also, create a folder called iOSVoicemails on your desktop—this is where your voicemails will be saved.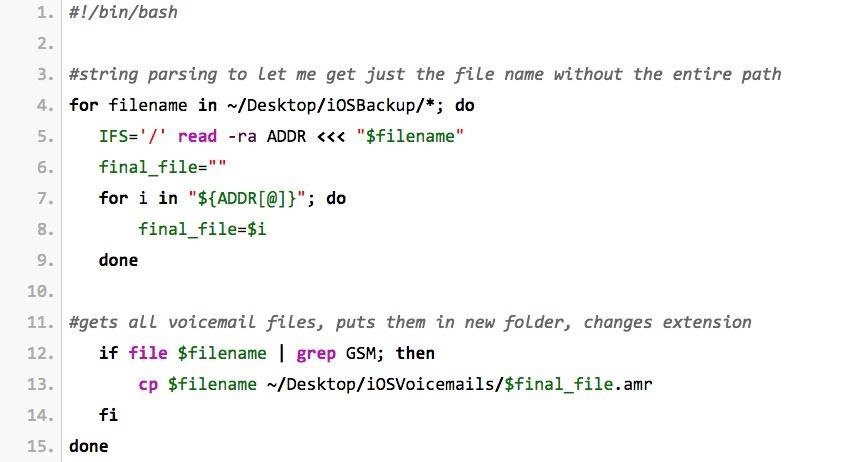
Step 4: Create Script on Your DesktopIn a previous version of this guide, we had a much more complicated way of going about the process of extracting the voicemails from your backup. Thanks to WonderHowTo user Lauren Pattison, the process is now much more simple, thanks to a nifty script she wrote and provided to us.Open Terminal and enter the following:cd DesktopHit enter. This is to to set the directory. Now you're going to create the script by entering:vim voicemailscript.shAgain, hit enter. Now type:iThis will allow you to insert text. Now type the following text into Terminal, indentations and all. You can copy it here from the file on Pastebin, then paste into Terminal to make things easier. After pasting the text, hit the escape key on your keyboard and type in::wqAnd hit enter.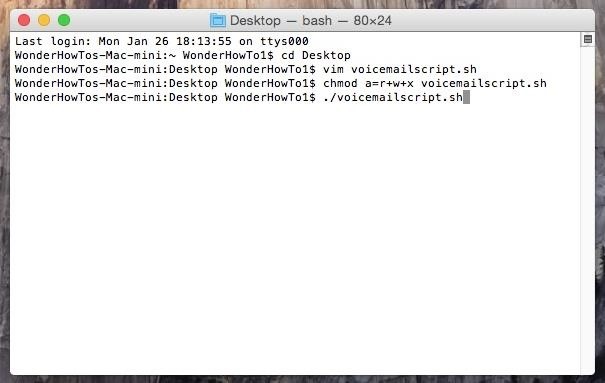
Step 5: Make Script Executable, Run ItStill in Terminal, type in:chmod a=r+w+x voicemailscript.shHit enter. This will make the script executable. Finally, type in:./voicemailscript.shAnd hit enter one more time, which will run the script. A list of all your voicemails will show up in Terminal.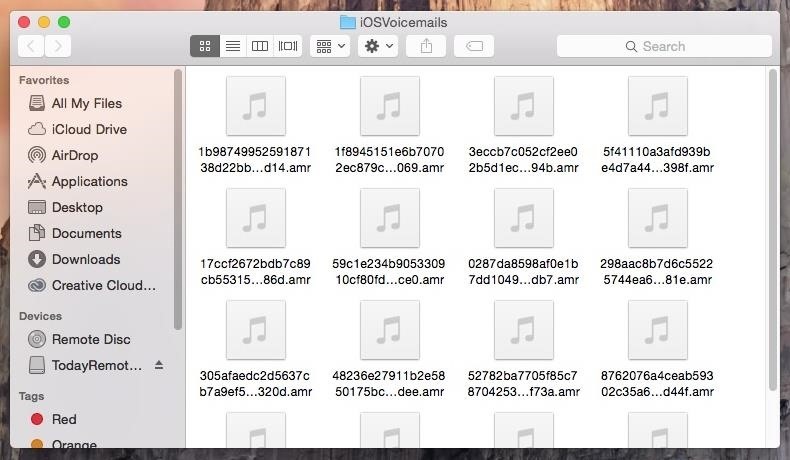
Step 6: Listen to Voicemails, Convert Them to .M4AIn the iOSVoicemails folder on your desktop, you'll find all of the voicemails from your backup. When you find the voicemails that you want to keep/share, open them in QuickTime Player, go to File, click on Export and select Audio only.... Now press Save and your voicemail will be saved in an .m4a file that you can share and upload on the internet. And that's all there is to it.
How To: Install Ubuntu on your Samsung Galaxy Tab 10.1 Android tablet How To: Install Adobe Flash Player on a Samsung Galaxy S4 to Watch Amazon Instant Videos & More How To: Share Your Samsung Galaxy S3's Screen with Other Devices
How to Install Flash on Any Kindle Fire « Amazon Fire
Secrets of Magic Illusions and Tricks! Learn how to make yourself disappear and more! In this How To Magic episode, Evan Era shows How To Make Yourself Disappear 5 magic ways! Easy vanish magic
How to hide someone from my Facebook without blocking them
How To: Root Your OnePlus 6 with Magisk — A Beginner's Guide How To: Update Your OnePlus 6T Without Losing Root — No Computer Needed How To: Unroot & Revert Your OnePlus 5 or 5T to 100% Stock How To: Get Dolby Atmos on Your OnePlus 6T for Enhanced Audio
How to Root OnePlus 7 Pro [Unlock Bootloader & Flash Magisk
I decided that I'd try to build my own show as I'm not willing to shell out a huge amount of money for something that I may be able to make on my own. So, I'll show you how I made my very own laser light show that will project either a really cool spider-webby hexagon effect or a crisp triangle effect using a few very common and cheap materials.
Easy Laser Light Show: 12 Steps - instructables.com
Windows XP makes backup copies of your system files which may use a lot of space on your harddisk. To empty the system file cache, click on Start > run Now enter the command "sfc /purgecache" and click on "Ok".
Have Windows xp. How do you empty cache? Thanks. - CNET
The Safest Way to Disable ALL Bloatware on Your Galaxy S10
As today article is about Samsung Galaxy S4, then in this article I'm going to share with you a full guide about how to unroot and restore back to official stock firmware for Samsung Galaxy S4
[Unroot/Unbrick] Restore Samsung Galaxy S6 Back To Stock
This guide breaks down the new privacy settings in iOS 11 that you should check, along with settings that have existed since previous versions of iOS. Make sure to read this list carefully, and check any settings that apply to you. After all, you don't want your valuable data escaping the confines of your iPhone.
The iOS 11 Privacy and Security Settings You Should Check
Download any video from any site using url online for free. Best free online video downloader, youtube video downloader, facebook video downloader, youtube mp3 converter
Download you favorite music and video from any website in
3. Clear Up Your iPhone's RAM Used by Apps. If you're looking to move away from swiping away apps every time entirely, then you can try to clear your iPhone's RAM used by all your apps which works just as like how you would Force close all your apps every time except this way you're getting to the root problem.
How to Get the iPhone X's Swipe-to-Go-Home Gesture on Any Android
Adding shortcut to the Android Home screen: From the Home screen, tap Apps, then tap on the Widget page to find the SugarSync Shortcut. Once it's dragged to the Home screen, the Create Shortcut option will be shown. Browse for the folder where this shortcut should point to. Remove a shortcut on the Android Home screen: From the Android Home
2 Android Apps to Create Custom Homescreen Shortcuts
Make a $100 super bright cop Flashlight for less than $10. Brighter than SureFire! Easy to do! Check out my 'secret' classic videos:


0 comments:
Post a Comment